Setting up Keycloak for use with Apicurio
This article describes how to use your own KeyCloak server to provide the authentication layer to Apicurio.
If you download the Apicurio Quickstart, you will notice that it is configured to use a cloud version of Keycloak for authentication. This is to make it easy to try out Apicurio locally but obviously isn't useful for production. So this article will describe how to download and install Keycloak, configure it to provide authentication for Apicurio, and finally how to modify the Apicurio configuration to use it.
1. Download & Install Keycloak
Let's start out by downloading a compatible version of Keycloak and unpacking/installing it locally.
Note About Operating Systems
For the purposes of this article we will assume that Linux is the target operation system, but both Keycloak and Apicurio will operate just fine on a Mac or Windows machine.
Go ahead and download Keycloak 7.0.1 from this URL:
https://www.keycloak.org/archive/downloads-7.0.1.html
Once downloaded, unpack the ZIP file in the location you want to install Keycloak.
mkdir ~/keycloak
cd ~/keycloak
curl https://downloads.jboss.org/keycloak/7.0.1/keycloak-7.0.1.zip -o keycloak-7.0.1.zip
unzip keycloak-7.0.1.zip
Optional Step: Install Apicurio Login Theme
Keycloak supports various themes, and Apicurio comes with a theme for the login page. This is entirely optional, but if you want to use it, grab the Apicurio Login Theme from GitHub and copy it to ~/keycloak/themes: https://github.com/Apicurio/apicurio-studio/tree/master/distro/keycloak
2. Startup Keycloak
Once you have Keycloak downloaded and installed, you can start it up using the following command:
cd ~/keycloak/keycloak-7.0.1
./bin/standalone.sh
Keycloak should start up cleanly, usually in about 10 or 20 seconds. If it starts up normally you should see a line like this at the end of the output:
07:51:28,452 INFO [org.jboss.as] (Controller Boot Thread) WFLYSRV0025: Keycloak 7.0.1 (WildFly Core 9.0.2.Final) started in 9015ms - Started 545 of 881 services (604 services are lazy, passive or on-demand)
3. Download & Install Apicurio
If you haven't done this part yet, go ahead and download the latest version of Apicurio. You can do this from the Apicurio Project site. Once you have downloaded the quickstart, install it by simply unpacking the ZIP file. There are instructions on the Apicurio site (linked above) that describe these steps. But skip the final step (startup), because we need to make some configuration changes to both Keycloak and Apicurio!
4. Configure a New Realm in Keycloak
Now that Keycloak and Apicurio are both downloaded and installed, and Keycloak is up and running, it's time to configure Keycloak! To do this you'll need to login to Keycloak. To do that, go here:
The first time you access Keycloak, you will be prompted to create an admin user. Go ahead and do this by providing new admin credential information.
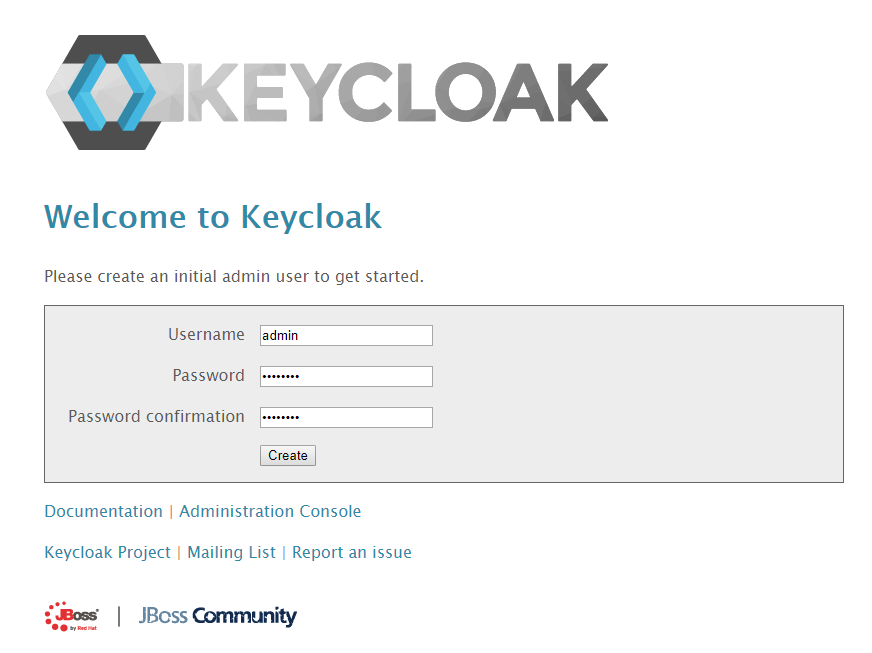
Create initial Admin user in Keycloak
Once the initial admin user has been created, you can go to the Admin Console and login using the credentials you just created.
Now that you've logged in as an Admin, you'll need to create a new realm for Apicurio. To do this, hover your mouse pointer over the Master realm in the top-left of the Keycloak admin console and then click Add Realm.
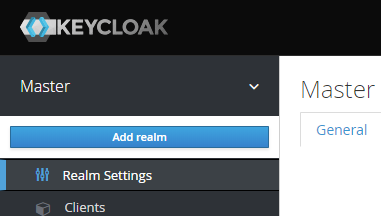
Add Keycloak Realm
Now, it's possible to simply create an empty realm and manually configure it. However, it's a lot faster to import the initial settings when you create the realm. We'll do that here so that this article isn't unbearably long. Download the Keycloak realm JSON file for Apicurio here:
https://github.com/Apicurio/apicurio-studio/blob/master/distro/openshift/auth/realm.json
After downloading that file, click the Select file button on the Add realm page in Keycloak, then choose the realm.json file you just downloaded. After selecting the realm.json file, you should be able to click the Create button.

Add Keycloak Realm
Realm Created!
Congratulations, you have successfully created the Apicurio realm in your local Keycloak instance. You're almost done in Keycloak - just one more change!
Now that the realm has been imported, there is only one setting that must be changed. You need to tell Keycloak where it should expect Apicurio to be coming from (Apicurio's URL). Keycloak will not allow applications from any random URL to use it for authentication. So not only do we need to tell Apicurio where Keycloak is (we'll do this in section 5 below) but we also need to tell Keycloak where Apicurio is. To do this, click on Clients in the right side of the Keycloak Admin Console. From the resulting list of clients, click on apicurio-studio.
You should see a form with the configuration options for this client. You'll see the value APICURIO_UI_URL occur in several fields. You'll need to replace that value with the actual URL location of Apicurio. For the purpose of this article we'll be running Apicurio on localhost with port 8180. Therefore, replace APICURIO_UI_URL with http://localhost:8180. The result should look something like this:
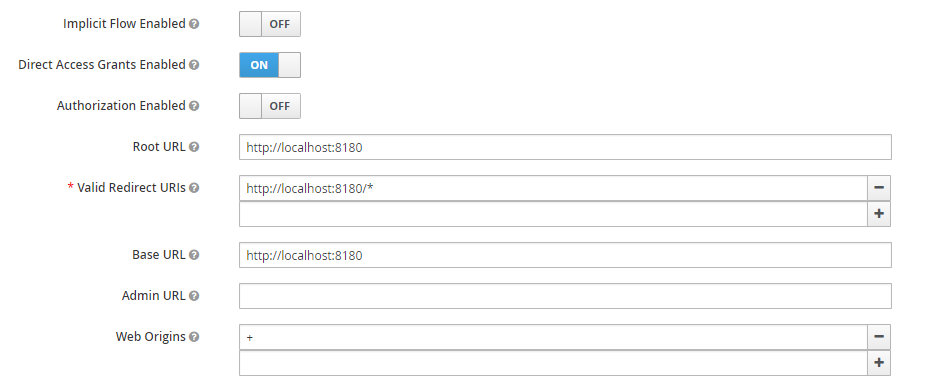
Configure Apicurio Client
"Apicurio" Keycloak Theme
One last thing - if you use the realm.json file to create the Apicurio realm, you will need to update the Login Theme to either "keycloak" or "base" to avoid a NullPointerException. Do this in Realm Settings->Themes.
5. Configure Apicurio to Use Your Local Keycloak
The last thing we need to do is change the Apicurio configuration to point it at the local Keycloak instance.
A Note About Domain Names
For the purpose of this article we're running both the Apicurio and Keycloak servers on the same machine (our localhost). Of course you probably want to run them on separate machines, and give those machines real domain names. However, that configuration is outside the scope of this article. Simply replace the various localhost names in this article with appropriate names for the respective servers.
In order to connect your local Apicurio server to our local Keycloak server, you must make some changes to standalone/configuration/standalone-apicurio.xml. In particular, you must change the apicurio.kc.auth.rootUrl and apicurio.kc.auth.realm properties (which can be found in the system-properties section of the file. For example, change these values to:
<system-properties>
    <property name="apicurio.kc.auth.rootUrl" value="http://localhost:8080/auth"/>
    <property name="apicurio.kc.auth.realm" value="apicurio"/>
    <property name="apicurio.hub.storage.jdbc.type" value="h2"/>
    <property name="apicurio.hub.storage.jdbc.init" value="true"/>
</system-properties>
Apicurio Configured
You have successfully configured Apicurio to use your local Keycloak installation for authentication! All that's left to do is startup Apicurio and make sure it works!
6. Start Up Apicurio
As mentioned earlier, this article assumes we're running both Keycloak and Apicurio on the same machine. You'll need to alter the article's instructions appropriately if this is not the case (which is likely). In any case, it's now time to start Apicurio and log in. To start Apicurio on the same machine as Keycloak without running up against port conflicts, run this command:
./bin/standalone.sh -c standalone-apicurio.xml -Djboss.socket.binding.port-offset=100
This will start Apicurio on port 8180 instead of port 8080. Once the application starts up (maybe 30 seconds) you should be able to log in! Go here:
All Done!
You should be able to log in using your local Keycloak installation. We haven't configured social logins or account linking (more on that in the next section!), but users will be able to register new accounts and then login. Of course, you should feel free to read up on Keycloak documentation to learn what other awesome features it has! If you're running these servers in production, you'll certainly want to make sure you follow the Keycloak best practices for doing so.
7. Configure Keycloak for Account Linking
Apicurio has a feature where users can link their GitHub, GitLab, and/or Butbucket account, which is required for several Apicurio features to fully work (Publishing an API and Generating an Implementation Project). In order for Account Linking to be possible, additional configuration must be completed in the Keycloak admin console.
7.1. Enable GitHub Account Linking
In order to support account linking with GitHub, you must make some configuration changes in both Keycloak and GitHub. This section explains the steps.
In the Keycloak admin console, click on Identity Providers in the left navigation and then add a new GitHub provider. In a separate browser tab, navigate to the OAuth Apps section under Developer Settings for your GitHub organization and click on New OAuth App (alternatively you can create a new OAuth app in your own personal GitHub settings).
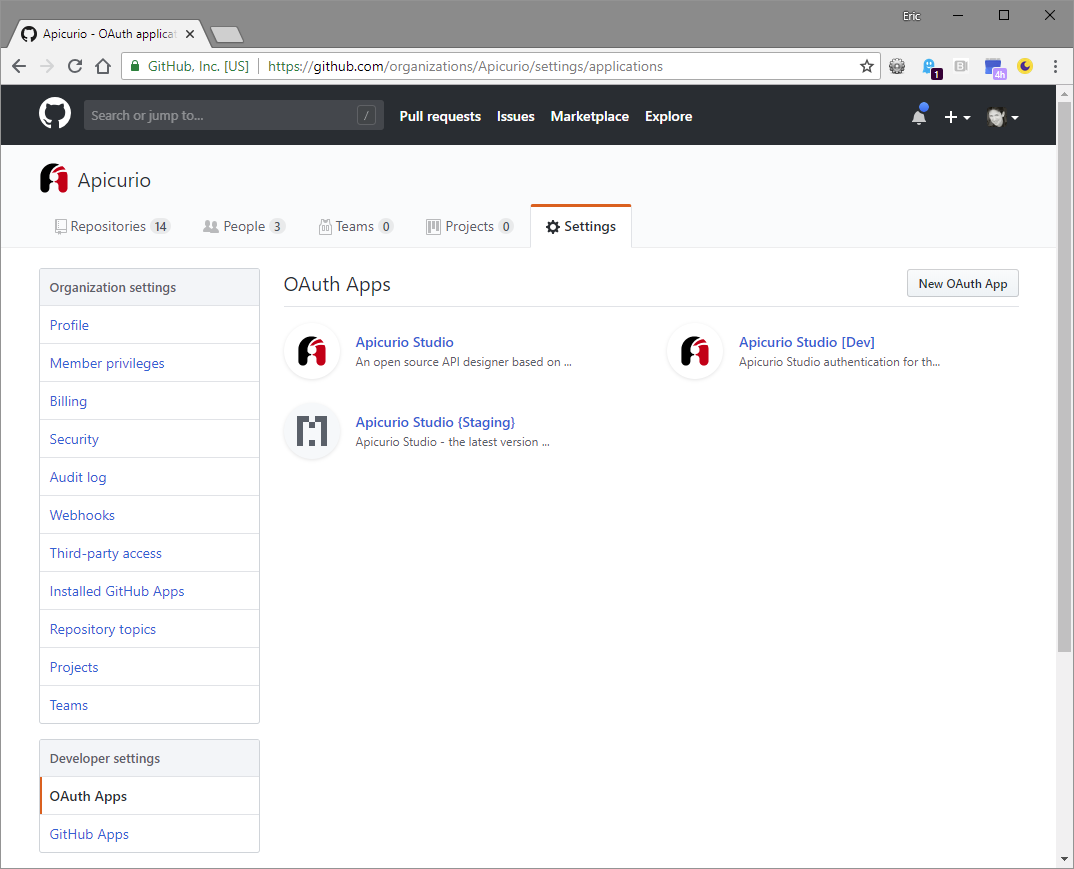
With both browser tabs/windows open, copy the "Redirect URI" value in the Keycloak form into the "Authorization callback URL" field in the GitHub form. Complete the remaining fields in the GitHub form and click Register application.
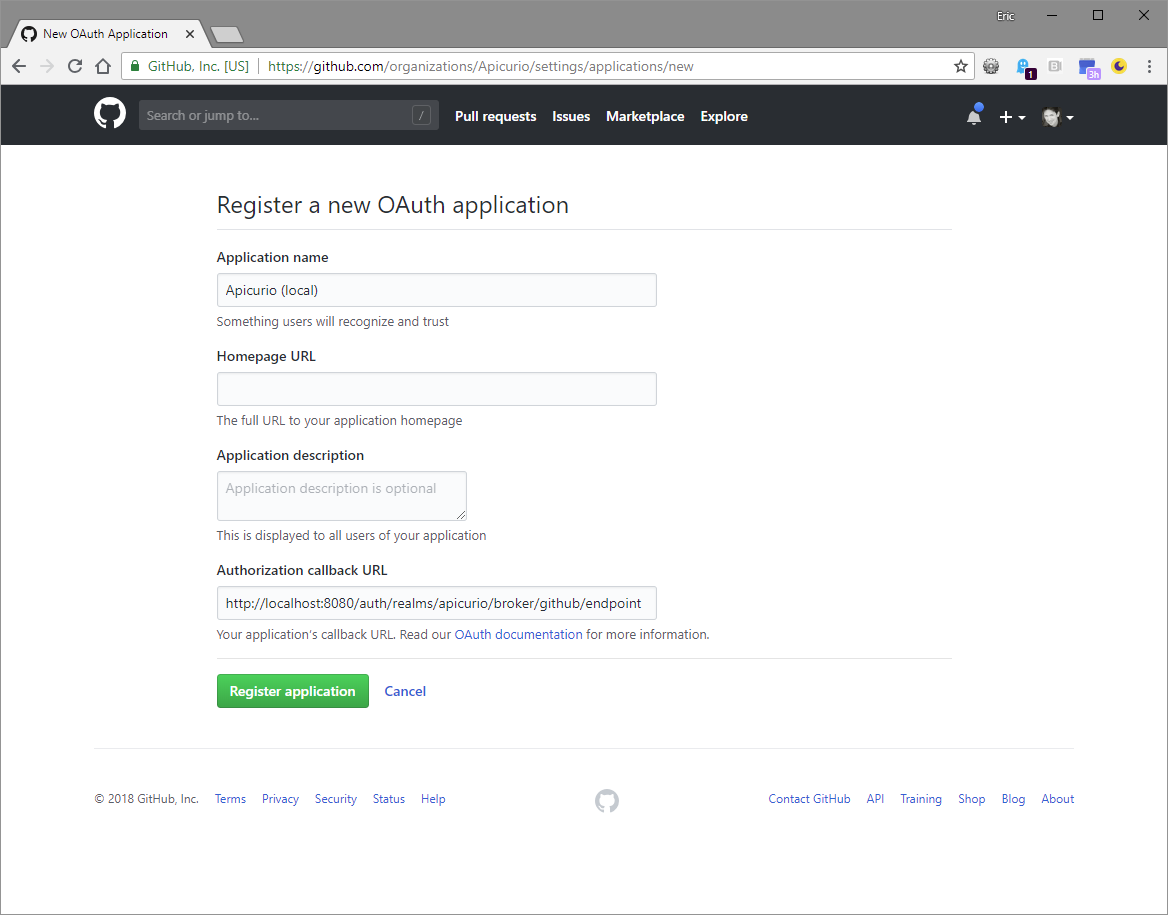
Once the GitHub application has been registered, copy the "Client ID" and "Client Secret" values from GitHub into the Keycloak form. Then complete the Keycloak form with the following values:
- Default Scopes: read:org,repo,user:email
- Store Tokens: on
- Stored Tokens Readable: on
- Enabled: on
- Disable User Info: off
- Trust Email: on
- Account Linking Only: either
- Hide on Login Page: off
- GUI Order:
- First Login Flow: "first broker login"
- Post Login Flow:
When done, click Save on the form to save the identity provider.
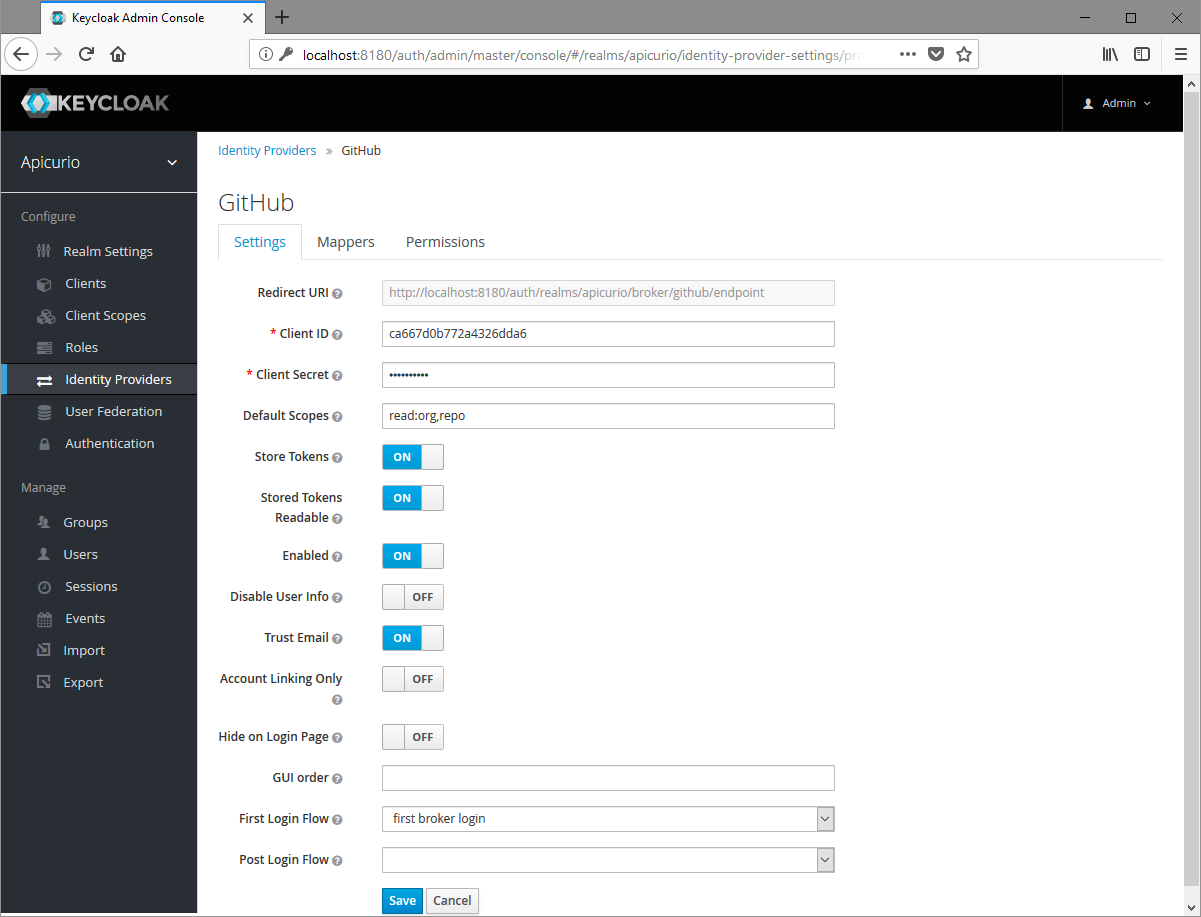
You should now be able to not only link your GitHub account in Apicurio but also login to Apicurio using your GitHub account. Note: to disable GitHub login, simply turn Account Linking Only on.
GitHub Social Login
Note: to disable GitHub login, simply turn Account Linking Only on!
7.2 Enable GitLab Account Linking
In order to support account linking with GitLab, you must make some configuration changes in both Keycloak and GitLab. This section explains the steps.
In the Keycloak admin console, click on Identity Providers in the left navigation and then add a new GitLab provider. In a separate browser tab, navigate to the Applications section under GitLab Settings.
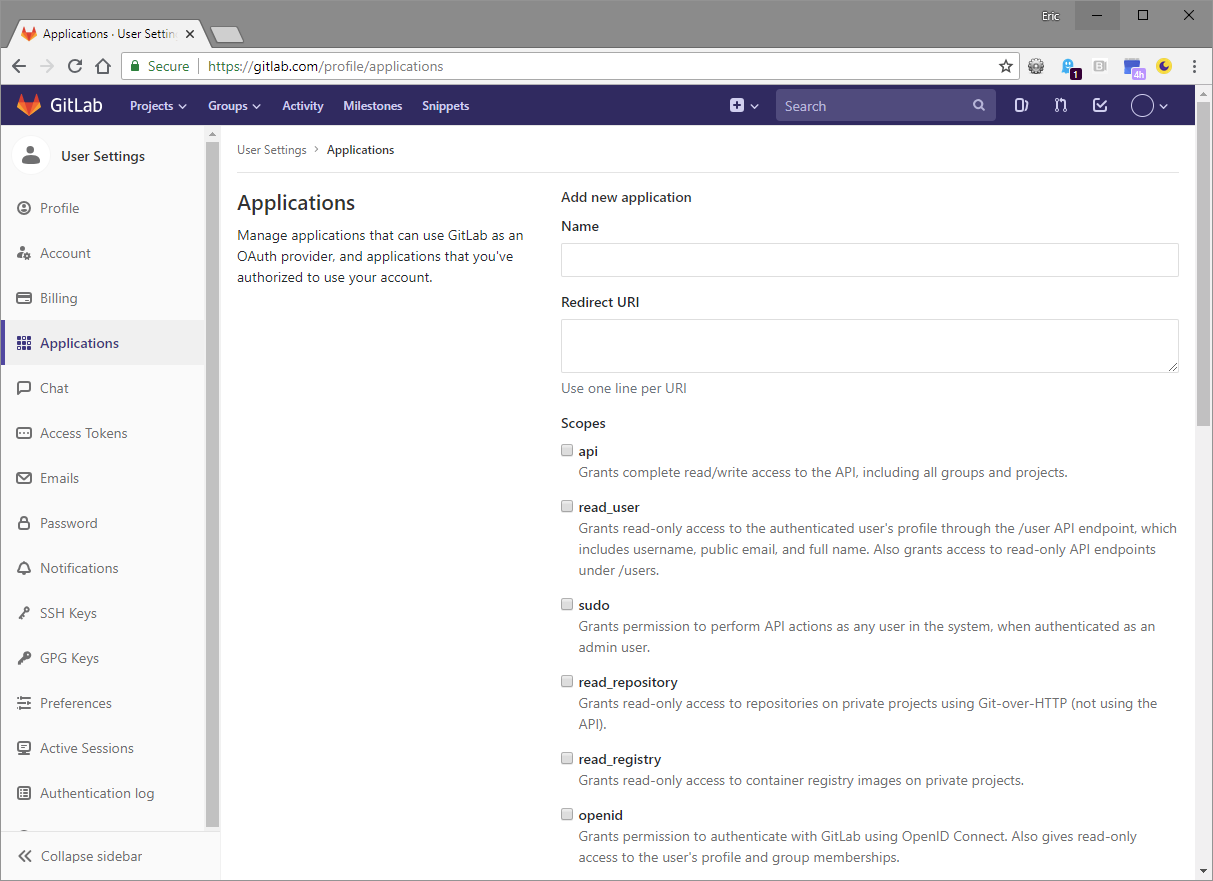
With both browser tabs/windows open, copy the "Redirect URI" value in the Keycloak form into the "Redirect URI" field in the GitLab form. Complete the remaining fields in the GitLab form and click Save application. Make sure you have the following Scopes selected before clicking save:
- api
- read-user
- openid
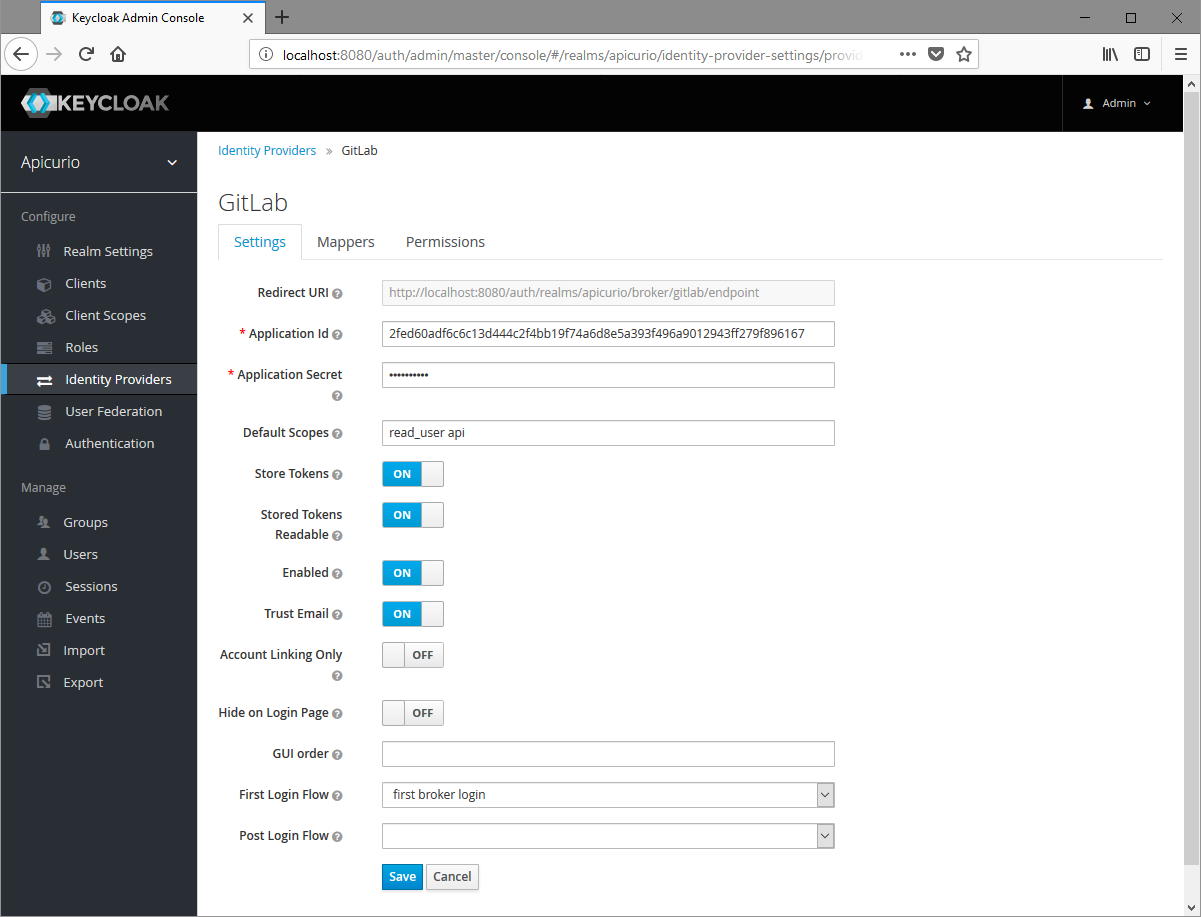
Once the GitLab application has been saved, copy the "Application ID" and "Secret" values from GitLab into the Keycloak form. Then complete the Keycloak form with the following values:
- Default Scopes: api email read_user openid profile
- Store Tokens: on
- Stored Tokens Readable: on
- Enabled: on
- Disable User Info: off
- Trust Email: on
- Account Linking Only: either
- Hide on Login Page: off
- GUI Order:
- First Login Flow: "first broker login"
- Post Login Flow:
When done, click Save on the form to save the identity provider.
7.3 Enable Bitbucket Account Linking
In order to support account linking with Bitbucket, you must make some configuration changes in both Keycloak and Bitbucket. This section explains the steps.
In the Keycloak admin console, click on Identity Providers in the left navigation and then add a new Bitbucket provider. In a separate browser tab, navigate to the OAuth settings for your group or user. The OAuth section is under Settings->Access Management. Then click Add consume to create a new Bitbucket OAuth consumer.
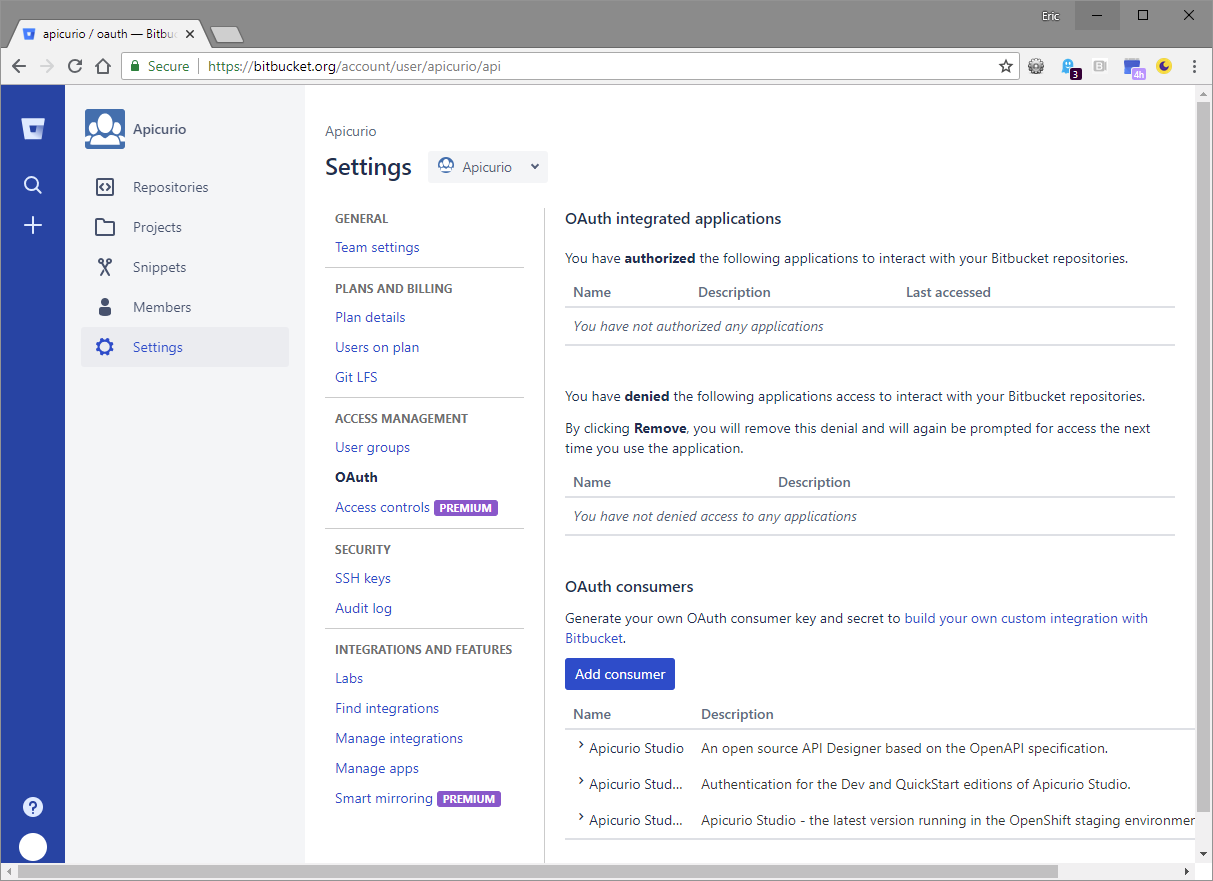
With both browser tabs/windows open, copy the "Redirect URI" value in the Keycloak form into the "Callback URL" field in the Bitbucket form. Complete the remaining fields in the Bitbucket form and click Save. Make sure you have the following Scopes selected before clicking save:
- Account:read
- Team membership:read
- Projects:read
- Repositories:write
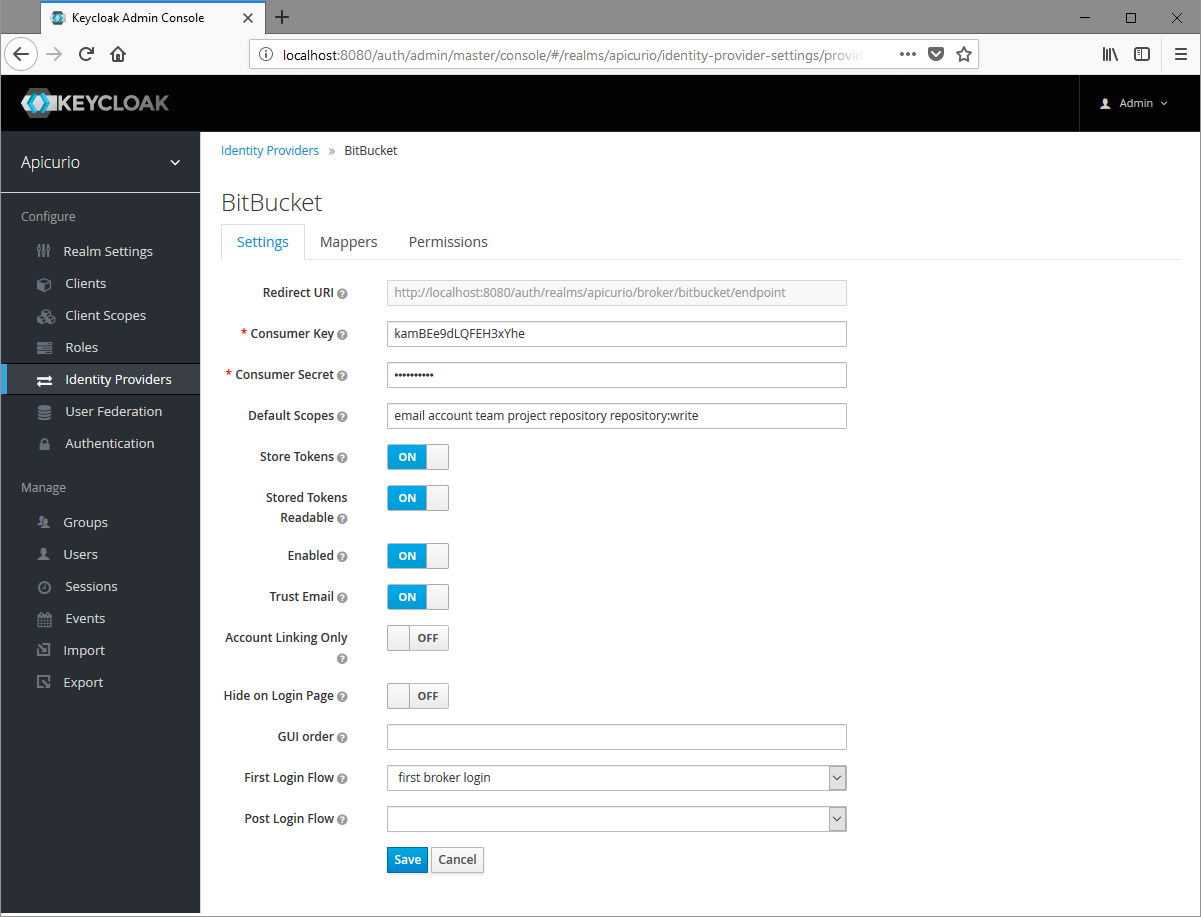
Once the Bitbucket consumer has been saved, copy the "Key" and "Secret" values from Bitbucket into the Keycloak form. Then complete the Keycloak form with the following values:
- Default Scopes: email account team project repository repository:write
- Store Tokens: on
- Stored Tokens Readable: on
- Enabled: on
- Disable User Info: off
- Trust Email: on
- Account Linking Only: either
- Hide on Login Page: off
- GUI Order:
- First Login Flow: "first broker login"
- Post Login Flow:
When done, click Save on the form to save the identity provider.
Updated over 6 years ago
